A Cozy Twisted Crochet Headband for Chilly Days
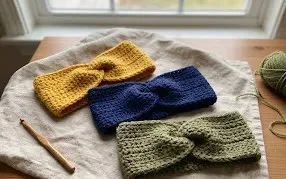
A soft crochet twist headband keeps hair out of your face while adding a neat, gathered detail at the front. Its simple shape suits beginners who want a wearable project without a long list of techniques, and it makes a thoughtful handmade gift when you know someone’s favorite color. The twist gives the finished band a little texture and interest, while the fabric can be made comfortable and stretchy with steady tension. In this pattern, you’ll learn how the headband is worked and how the ends come together to create the twist. Clear guidance and a video tutorial help you follow along, check your work, and finish with a headband you can wear on cool mornings or tuck into a gift basket.
Why You’ll Love This Pattern
A firm cotton dishcloth with a simple single-crochet fabric is useful at the sink and easy to keep in rotation. This beginner pattern uses the same stitch in every row, so you can focus on making even edges and counting accurately.
The rectangle works up without shaping or sewing, and one skein usually provides enough yarn for the cloth. Cotton absorbs water and handles regular washing, while the straightforward rows make this a practical project for practicing consistent tension.
The rows were easy to follow, and I had a useful dishcloth finished in an afternoon. Counting the stitches at the end of each row kept the sides straight.
— Jamie, sample-maker
Pattern Overview & Skill Level
- Skill Level: Beginner. You need to know how to chain and single crochet.
- Approximate Time: 2–3 hours, depending on your pace and how often you stop to check your work.
- Construction: A flat rectangle worked back and forth in rows. Each row contains 25 single crochet stitches; there is no seaming or edging.
- Finished Dimensions & Sizing: About 7 × 6¼ inches (18 × 16 cm) when worked to the suggested gauge. Small differences in tension will change the finished measurements.
Materials & Supplies Needed
- Yarn: About 60 yards of worsted-weight (#4) 100% cotton yarn in one color. A smooth, light-colored yarn makes it easier to see each stitch.
- Hook: 5.0 mm / H-8 crochet hook. Use a hook that helps you meet the gauge rather than relying on the label alone.
- Notions: Tapestry needle for the two yarn ends, scissors, and a ruler or measuring tape. A removable stitch marker is optional for marking the first stitch of a row.
- Substitutions: A similar amount of cotton-linen yarn can make a slightly textured cloth; check its label and swatch first. Cotton blends may feel softer or less absorbent. Acrylic is less suited to dishcloths because it does not absorb water as well. Changing yarn weight or hook size changes the cloth’s dimensions and may change how much yarn you need.
Gauge: 14 single crochet stitches and 16 rows measure 4 inches (10 cm) in a flat swatch, after gently washing and drying it. If your swatch is wider than 4 inches, try a smaller hook; if it is narrower, try a larger hook. The stitch count sets the width, while the number of rows sets the length.
Stitch Guide & Abbreviations (US Terms)
- ch = chain.
- sc = single crochet. Insert the hook into the stitch, yarn over, pull up a loop, yarn over, then pull through both loops.
- st(s) = stitch or stitches.
- rep = repeat.
The turning chain does not count as a stitch. Work the first single crochet of each row into the first stitch, which is the stitch directly below the turning chain. This keeps the stitch count consistent from row to row.
Step-by-Step Pattern Instructions
Dishcloth
- Foundation: Ch 26. The extra chain is for turning and does not count as a stitch.
- Row 1: Sc in the second ch from the hook and in each ch across. Turn. (25 sts)
- Row 2: Ch 1, sc in each st across. Turn. (25 sts)
- Rows 3–25: Rep Row 2 for 23 rows. After Row 25, do not turn. (25 sts each row)
Check the rectangle’s length as you work. At the stated gauge, 25 rows measure about 6¼ inches (16 cm). If your fabric is shorter or longer, continue or stop when you reach your preferred length, noting that this changes the yarn requirement and finished size.
Finishing
Cut the yarn, leaving a tail of about 6 inches (15 cm), and pull the tail through the final loop to secure it. Thread the tapestry needle and weave in both ends through several stitches on the wrong side. Change direction once before trimming so the ends are less likely to work loose in the wash. Lay the cloth flat and smooth the edges; no seam or separate border is needed.
Care & Washing Instructions
- For 100% cotton, machine-wash with like colors in warm water, up to about 40°C (104°F), or follow the yarn label if it gives a lower limit.
- Tumble-dry on low or lay flat to dry; high heat can shrink cotton.
- While damp, gently reshape the corners and sides. Blocking is optional for a dishcloth, but smoothing it flat helps it dry evenly.
Pro Tips & Common Mistakes to Avoid
- Keep your chain and single crochet tension relaxed. A very tight foundation chain can pull the bottom edge inward; if that happens, remake it with a larger hook just for the chain.
- Count the 25 stitches at the end of every row. Place a marker in the first stitch if you tend to miss the last stitch at the far edge; the turning chain does not replace it.
- Weave in the yarn ends with a tapestry needle, passing through the backs of several stitches and changing direction. Do not leave long loose tails on a cloth that will be handled and washed often.
- To make the cloth wider, add chains to the foundation, then single crochet into the second chain and each chain across. Each extra foundation chain adds one stitch and roughly 1/7 inch (0.36 cm) at gauge; a wider or longer cloth uses more yarn.
Frequently Asked Questions
Can I use a different yarn fiber?
Yes, but cotton is a practical choice because it absorbs water and tolerates frequent washing. A cotton-linen blend can also work, though it may feel firmer. Acrylic is less absorbent, so it may not perform as well for wiping dishes. Check the yarn label and make a gauge swatch before starting.
How can I make the dishcloth larger or smaller?
For a wider cloth, add chains to the foundation; for a narrower one, use fewer chains. Work more or fewer rows to change the length. Keep in mind that larger dimensions use more yarn, and changing the yarn weight or hook also affects the finished measurements.
Is this pattern suitable for a first crochet project?
Yes. It uses only chains and single crochet, with no increases, decreases, color changes, or sewing. The main thing to practice is identifying the first and last stitch in each row so the sides stay straight.
May I sell dishcloths made from this pattern?
Check the designer’s terms before selling finished items, and follow any credit or sales conditions they specify. If you sell your work, describe the yarn and care instructions accurately and do not claim authorship of the pattern.
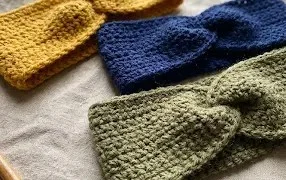
Your finished headband has a useful, comfortable shape and a front twist that gives a simple crochet fabric a bit of character. For a quick variation, make it in a second color, or adjust the band’s length to suit the person who will wear it. A soft yarn and even tension help the finished piece sit comfortably without feeling too tight. If you make one, share a photo on Pinterest or your favorite social media platform so other crocheters can see your color choice and finished twist. Then browse the blog for more free crochet patterns, including small projects that are handy for gifts and everyday use.